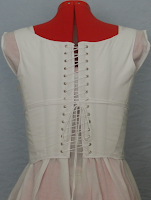
As promised, a JAFA sewing challenge progress report! My first official costume piece is a petticoat, since I had already completed my chemise, pantalettes and stays before I entered the challenge (I included some info about them anyway, just in case anyone is interested).
Chemise
I made my chemise out of white cotton lawn, using the
Sense & Sensibility Regency Underthings Pattern. I didn’t add the little sleeves because I didn’t
particularly like them, I don’t know where the short-sleeves of a gown will sit
as yet, and it would look silly under longer sleeves, so I figure if I need to
I can just line the sleeves of the gown.
Pantalettes
The pantalettes are Simplicty 2890.
The style is a little later than those worn during the Regency period, which was basically two tubes fastened
around the waist, which looked about as appealing as the idea of going au natural.
I made these to sit on my hips, rather than around my waist as the pattern
directs, so I would actually be able to access the drawstring under my
corset... something it didn’t look like the pattern took into account!
I pinned the pattern together to see how it would fit
before I started cutting my fabric, and since it looked rather large I opted to
go a size smaller than I would usually wear, and they stilled turned out
massive! The waist/hips are about three times larger than my actual size, which
makes for some lovely gathers, but wastes an awful lot of fabric.
Stays
I wanted long stays, as opposed to the more popular short
stays of the period, so I used the Simplicity 2621 corset pattern as my base and added four bust gussets.
I used white cotton broadcloth for the lining and white
cotton lawn for the cover, with cotton/polyester bias binding. (I will also
note for anyone attempting similar that cotton broadcloth was a horrendous
choice for lining, as any cut edge frays like crazy, making neat seams and the
application of bias binding pretty difficult: the thickness of the fabric was
fine, but next time I will go for something with a tighter weave.)
The busk is a timber scrap my dad cut to size for me
(hardwood is recommended, but I think this is only medium, and I haven’t had
any problems with it yet).
The rest of the boning is 450mm by 7.6mm black plastic
cable ties, cut to size, with hot glue applied to the ends to prevent the sharp
edges from piercing the fabric (seriously, cap your boning! I didn’t in my last
corset and it rips the fabric AND stabs you), as well as a few rows of cording
under the bust gussets.
Also note that if you’re going to add bust gussets to a
pattern that doesn’t already include them, you’re going to have to compensate
for the extra room by making the side or back panels a little narrower: I
didn’t and the top few eyelets at the back practically overlap when I lace it
up, and I’ll probably have to go back and put a dart under the arms to make the
stays fit properly.
A fabulous article on the Regency silhouette and how to
fit stays correctly can be found here.
Petticoat
The petticoat is based on the one seen here,
but made using the skirt outline from Simplicity 8852.
I cut three skirt panels and then sewed them onto a tubular waist band (so a tie
can be inserted), leaving the front panel straight, but pleating along the
sides, then added the shoulder straps. The ruffle at the bottom came
pre-pleated from Spotlight (thank you Spotlight!), and adds a nice bit of detail.
Next month: Chemisette!


No comments:
Post a Comment