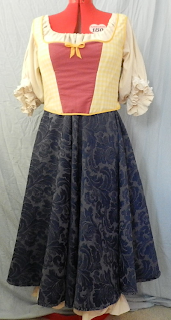
Hobbity sewing complete! *insert happy Hobbit dancing here*
Chemise
The chemise is calico and a combination of the neckline and
raglan sleeves of the Simplicity 5582 peasant blouse and the length of the
Regency Underthings chemise.
The neckline is drawstring with a few pleats at the back (because
the drawstring casing was just a tad too short for the neckline and I couldn't be bothered cutting and sewing an extra piece of fabric to make it match).
The sleeves are decorated with antique crochet lace (with an
adorable butterfly pattern) and criss-cross trim that I threaded with ribbon to
make the sleeves adjustable.
I added a ruffle to the bottom of the chemise to give the
bottom a bit more bulk when it’s under the skirt (and because I like ruffles!)
Chemise: front and back.
Chemise sleeve detail.
Bodice
The bodice is side-lacing with a sweetheart neckline, and is
comprised of four pieces: the back panel (brown cotton blend), two side front
panels (yellow gingham muslin) and the front (pinky red cotton).
The back panel is Simplicity 5582 bodice back. The front
side panels are a combination of Simplicity 5582 bodice front and my own
pattern for a curve-front fitted kirtle (use of the curve-front method inspired by this post: a good step-by-step how-to draft a curve-front bodice here). The front panel I drafted myself.
The back panel and front panel have two layers of lining: a thicker pink flannelette (from an old sheet) and white cotton. The yellow gingham muslin side front panels have a layer of pale yellow cotton instead of the pink flannelette, as the gingham muslin was too sheer for a pink lining.
The bodice is lightly boned with 7.6mm black cable ties, to help it keep it's shape. The ends of the cable ties are coated with hot glue to cover any sharp edges. Again the yellow gingham muslin proved too sheer for black cable ties, so the four under the yellow gingham are encased in white bias tape, secured by hot glue.
Gold eyelets were hammered in for the side lacing, and the entire bodice is finished with yellow bias tape, complete with bias tape bow (tutorial here)
Boning layout, pre-glue and bias tape.
Side lacing with gold eyelets.
Skirt
I made two circles skirts; one blue, one green; out of old jacquard tablecloths.
The blue table cloth was already circular, making its transition to skirt much easier (the bottom was already hemmed, score!). The green table cloth was rectangular and required a bit more fiddling with measurements and hemming (this post has lots of helpful pictures and confusing math about circle skirts... if, like me, you're not big on math, I can tell you that a 15cm/6" radius gives plenty of room to fit 105cm/41" hips)
I finished the skirts with a waistband in a similar colour, threaded it with elastic.
Costume front.
Costume back.
Inspiration:
Let me know if I have left out any details.
Next up is accessories. If anyone could recommend good Hobbit ears, or hairy feet, that would be awesome, otherwise I will spend hours derping around the internet getting distracted while looking for them on my own (what a shame ^_^)
I hope you have a Merry Christmas and a happy New Year!


